We had several severe thunderstorms over the summer. Many trees fell over and lost branches as a result. I love using branches to make my own trellises (see previous post
Branching Out), but have always wanted to take a bigger step and build a rustic arbor. Well, this summer I had the chance to do so.
The local dump was overwhelmed with fallen branches after the storms and I had a lot of wood to choose from - FREE wood. I tried to find four relatively tall and straight branches for the main structure of the arbor. I ended up with four cedar posts that someone dumped and two large, tall branches, as well as an assortment of other branches to use for the sides and roof.
 |
| Free wood haul from local dump. |
This project requires two people to piece together the sides and roof. Once again, I called upon my favorite contractor, Big Bern. Depending upon your stamina, this project may also require some, ah,
reinforcement (beer). Also used were a box saw, power and electric drill, hex / carriage bolt screws 6-8" long, and a number of drywall and decking screws in varying lengths.
 |
| Tools and "reinforcement." |
I began construction by piecing together the sides. They are connected with relatively hefty pieces of wood because we can get some pretty strong winds here in north country and I don't want the arbor to blow over. It rests on the ground. The branches (and posts) are bolted together and were sawed off to make them somewhat equal in height and length.
 |
| Sides bolted together. |
We temporarily braced the sides together before adding the roof. Here is where a second person is really needed to hold up the sides while the other secures the bracing. We used some leftover wood we had on hand for the bracing. We decided to construct the arbor where it was going to be placed because "rustic" means "not straight and perfect." I did use a level on the sides to make sure the arbor was resting evenly, horizontally, on the ground. I dug out or added dirt beneath each of the four main vertical posts as needed.
 |
| Sides temporarily secured with bracing. |
Then I selected pieces to make the frame of the roof. These branches were also sawed off to make them close to the same length. We then attached this framework on top of the four main posts. Again, it is helpful to have a second person hold the branches in place while the other secures them.
 |
| Roof framework. |
 |
| Roof attached. |
From here on out I was able to complete the arbor myself. I added cross branches and "joists" on each of the four corners where the posts met the roof framework to make the structure more sturdy, and then removed the temporary bracing.
 |
| Cross branches and "joists" added to sides. |
|
|
|
I added a cross piece on each face of the roof framework. Then I began adding the roof by placing branches vertically along the framework. Being short, I needed a step ladder. I held up the branches and marked the length of each with a marker, then pruned them off before screwing them onto the framework.
 |
| Roof under construction. |
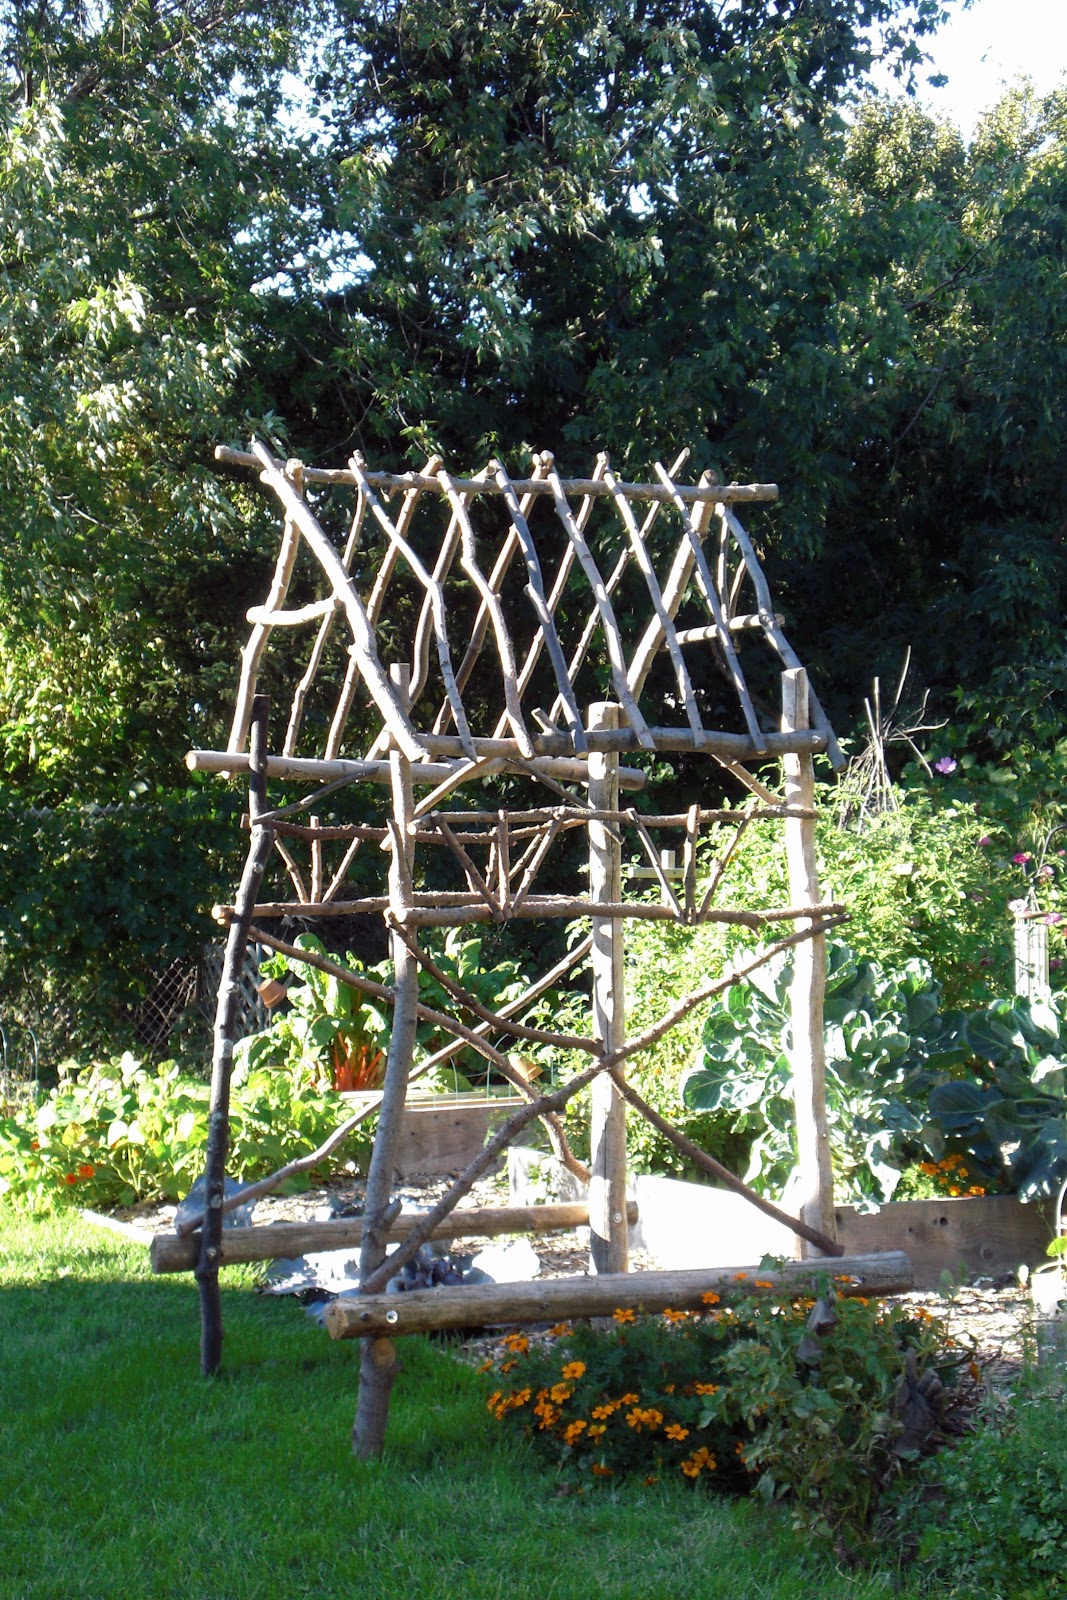
 |
| Roof completed. |
Finally, I added some decorative branches in a fan shape. I have a half circle of log that I am going to place above the cross bar on the front face of the roof as you enter through the arbor. On it, I plan to engrave "Mohala," the name of my garden. I will also extend the mulch path to include the entire arbor.
I now have a grand entrance to my potager. It will also give this garden some presence over the winter. The shadows from the branches should look pretty across the snow.
You could probably finish this project in a weekend once you have gathered the wood. I took my time and worked on it here and there over the summer. Can't wait to grow Scarlet Runner Beans over this arbor next year!


I love your arbor, much better than any you could buy. Great job! I love building stuff such a sense of accomplishment and pride when a project turns out so good.
ReplyDeleteYour arbor is wonderful, and I'm so glad you showed it step by step! I've been discussing a similar trellis with my husband...these pictures will help! Thanks so much!!
ReplyDeleteI've invited you to participate in the 10 Things Meme. I linked to you on my current 10 Things post. I hope you'll join in! :D
Fun to look at, and how much fun it must have been to build!
ReplyDeleteThat is just wonderful! I too use the amber liquid as reinforcement...makes those long projects more fun! Love your bird list, love your blog! Hope you're having a great week!
ReplyDeleteCheryl
I LOVE LOVE this arbor! Your garden is lovely! Thanks for the inspiration. If only I could borrow Ben. ;>)
ReplyDeleteThis looks fantastic! And it really adds to your potager. I'm afraid my friends and family would think I had become uppity, if I referred to my vegetable patch as a potager, but the word fits yours perfectly!
ReplyDeleteHi TVF, I am so impressed by your ability to build such a beautifully rustic natural structure. Myself I pathetically lack the confidence to do this. cheers, catmint
ReplyDeleteWow, what a great, great job!!!!
ReplyDeleteAnd fab step by step instructions, makes it look easy, when I know it is not. It is a great entry to your potager, which is looking fabulous by the way.
This is so whimsical and lovely. How nice to have an arbor so uniquely your own. I love it!
ReplyDeletewhat a fabulouse arbour and ofcourse unique, I have found some wood at the back of the large shed that came with this house and would love to have a go at an arbour or arch, you inspire me to try, Frances
ReplyDeletebtw I love your potager too,